
Master's Dissertation | VR Photography
01 // PROJECT_ABSTRACT
Traditional photography modes within gaming environments are passive and often an afterthought lacking any sort of educational context or teaching, simply providing the tools to create photos. This project aimed to tackle that limitation by creating a VR environment that mirrors the mechanics of operating a real DSLR and coupling that with an AI assessment pipeline to generate actionable feedback for the user to improve their next photo. The user study performed suggests this tool would be effective should it be taken from the prototype phase to the full application.
02 // ARCHITECTURE_DETAILED
There is a three phase structure to this project, the unity environment the user interacts with, The flask server that acts as a bridge, and the python backend which serves as the computational stage for photo assessment.
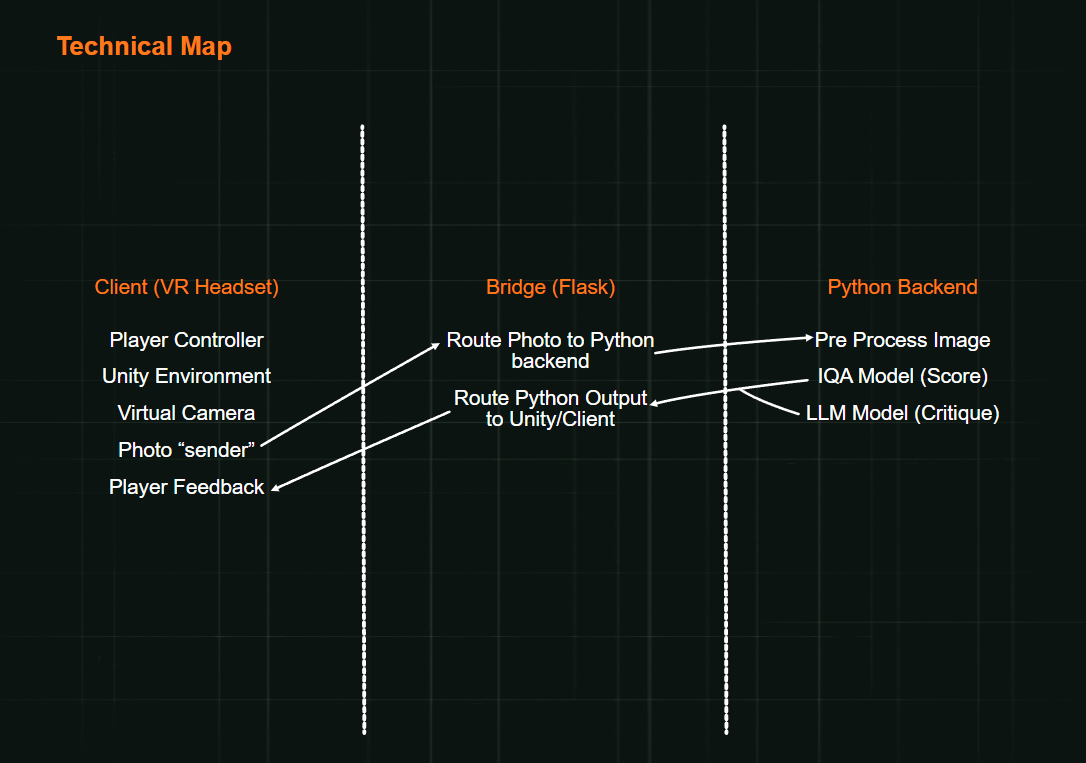
Unity Environment
The unity environment for this prototype aimed to mirror the process of taking a photo using a DSLR in real-life as closely as possible. The focus was on the functionality of the camera over the environments themselves. Due to this fact i made use of low poly environments, specifically demo environments from asset packs i had previously purchased, for two main reasons: First, i could source a lot of environments quickly which due to the short time frame for this project was essential (3 months all inclusive planning -> finish). Secondly, they are far more performant which is necessary due to limited computational budget from running multiple AI models and VR alongside the unity application.
To make the camera feel as close to the real thing as possible i focused on the interaction with it, making the zoom and manual focus be applied by twisting rings on the lens, or navigating settings menus using the joystick on the quest controller to mimic the older style of DSLR over a touch screen which was something that was tested and ultimately felt too clunky and frustrating. I also added the beeps and shutter sounds you would hear from a real camera, and added auto focus alongside, ISO, shutter speed and aperture settings that were chosen due to being the most critical aspects to get ready for the prototype.
Python Backend
The python backend was split into 3 main stages: NIMA image assessment, Mathematically calculated metrics and MLLM generated feedback using llama vision 3.2.
NIMA
Google's (Neural Image Assessment) Model was chosen for this project due to it being built upon the mobile net architecture theoretically making it more performant than other similar models, but primarily it was chosen due to it making use of Earth Mover's Distance (EMD) calculations to generate the scoring. The reason this is better than other predictive models is because it predicts the distribution of human ratings, essentially meaning the score is penalised during training based on how wrong it is rather than just the fact that it is wrong, leading to a more accurate prediction overall. This project utilises two versions of nima, one aesthetically weighted and one technically weighted to generate two scores out of ten respectively.
Metrics
The backend makes use of three metrics to ground the AI feedback and combat hallucinations, Focus, Composition and Exposure as these are the most relevant metrics to the implemented virtual camera. Generating these metrics allows the user to see specifically where their image is underperforming, along with providing some explainability for the generated NIMA scores as that is a black box model that doesn't elaborate on why it scored an image the way it did.
To accurately calculate the focus and composition metrics for any given image taken within the application, i first had to determine the primary subject of the image, which could be done with another AI model however to mimimize computational load this was mathematically calculated, while this could potentially be less accurate than a well trained AI it is far easier to run and gives explainable results. The way this is calculated is through the use of Sobel edge detection, focal masks using focus data from the unity camera and binary opening to find the most likely subject. This is then used to check it's location against the rule of thirds points (only for 1920x1080 in this version) to get a composition score. For the focus score the backend compares the average depth of the subject against the focus distance from the camera with some tolerance for the physical depth of the object.
Finally, for generating the exposure score i made use of histograms allowing the backend to generate specific exposure metrics like clipping values, shadow density, highlight density and tonal range along with overall brightness. Then using those metrics in a weighted calculation to give the overall exposure score for the image.
Llama-Vision 3.2
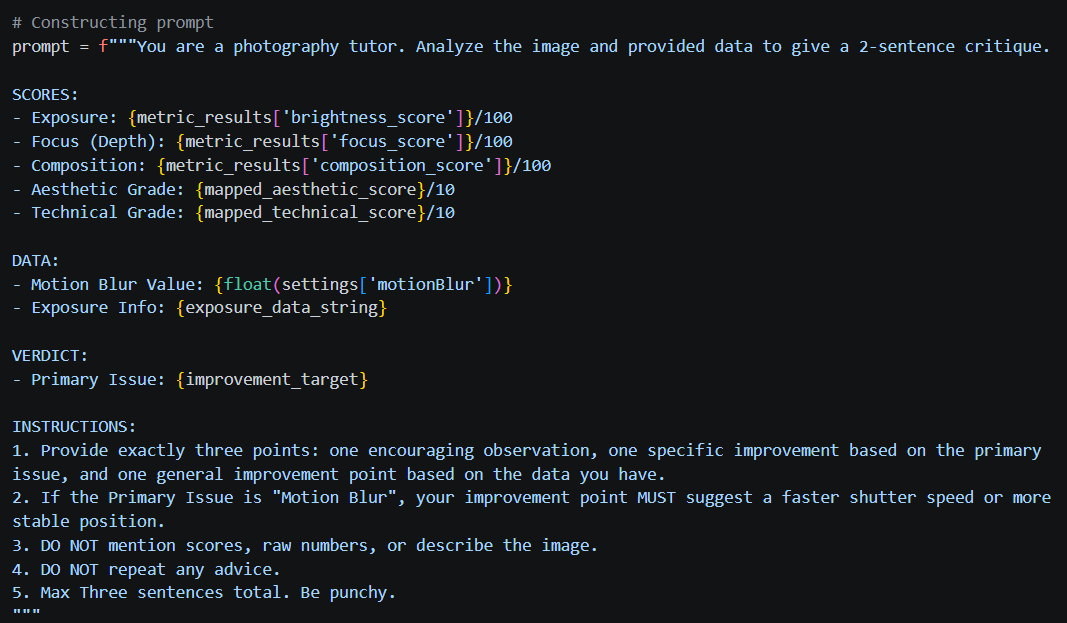
The role of the MLLM model, in this case Llama-vision 3.2, chosen because it is open source and not as resource intensive as other models, is to take all the given data and interpret it into readable, actionable feedback for the user. It is provided with the NIMA scores, the metric data, and the image itself to generate the feedback along with some instructions to avoid attention drift as much as possible
03 // HURDLES_RESOLVED
The main technical challenges for this project was working within the new Unity render graph system and making sure the project ran smoothly while in VR to avoid any motion sickness.
Render Graph
The Render graph system has become the main render pipeline for Unity in versions 6+, and its main aim is to optimize runtime resources for rendering automatically improving performance overall. It also introduces custom scriptable render passes to allow you to grab data you need during this cycle so everything stays optimized. It's because of the benefits and future proofing i decided to work within this new system rather than jumping back a few versions or finding some other workaround instead.
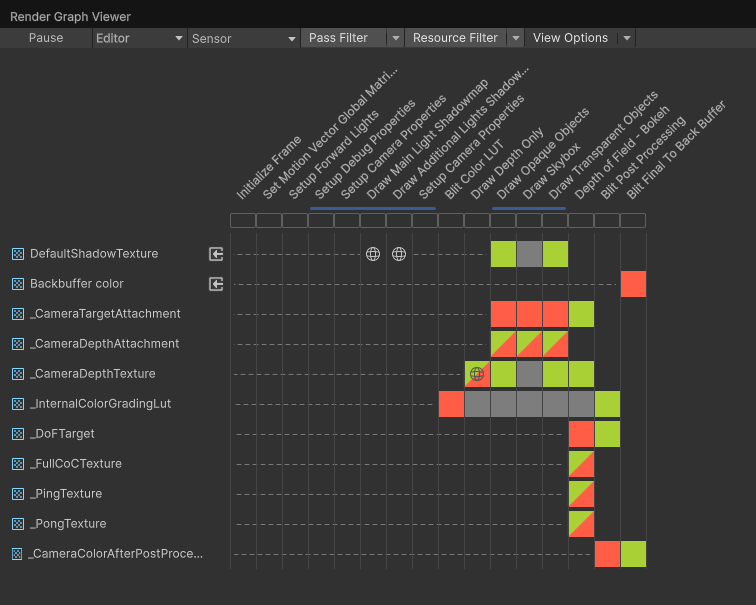
I made a single render pass to grab both the color data (The image from the camera) and the depth data from the camera in the exact same frame, allowing me to utilise this information within the backend to calculate the subject far more accurately than i would have been able to otherwise. Another benefit of this setup is it tackles the second technical challenge in optimising the project for VR along with having available computational resources for the backend calculations and AI models.
Performance
Optimising the project came in a few different forms for this project, one being the render graph previously mentioned. Another was the choice of AI models i ran and how i ran them, choosing NIMA was primarily due to it's better performance at the time but it had the added benefit of being built upon the mobile net architecture making it much smaller and more performant than other models, the two versions of this were also ran sequentially rather than simultaneously to avoid any freezing or stutters in the unity application.
Another choice for computational load was to use mathematical calculations for the subject detection within the metric calculations instead of a third AI model which also had the added benefit of being explainable rather than black box. Finally for the backend, i ran the smallest Llama-Vision model (11b Parameters) through a local client Ollama, which has automated memory management and hardware offloading out of the box rather than having to manually optimize how it's ran within code and potentially getting it wrong.
The final optimization that i will mention is the choice to include a "Review station" for the photos taken within the application, again there are multiple reasons for this, firstly it mirrors the real world work flow of taking photos on camera choosing which to keep at a glance using the camera itself and then offloading them to a pc or some other device to edit or review further. But the optimization benefit of this review station is that it allows the user to choose when they want to run all the heavy analysis rather than it being run on every photo taken or when they view them on the camera creating deferred execution, which i put a loading screen in so the user expects to have to wait making it a less frustrating experience.
04 // RESEARCH_PAPER
If you would like to look at the full research paper i wrote for this project which is far more detailed, please click the link below.
> FETCH_FULL_RESEARCH_PAPER.PDF (Detailed Methodology & Findings)